
Go to Setup > Yes/No Options > POS Screen > Unlock Permissions for One Transaction only.
When using this setting, the Unlock Permissions function will only apply to the current transaction and once the current transaction is finalised, the standard permissions will be restored.
No confirmation screens are displayed for this process.
To add the button to the POS Screen, go to Setup > POS Screen > POS Screen Setup > select Layout > Buttons.
Idealpos creates a button by default on the Admin Tab.
Password - You have the option of adding a password to this button, that must be entered before any permissions will be unlocked.
Warning!
If you enter a Password for the button, anyone who has access to the POS Screen Setup can view the Password when modifying the button.
Therefore, please ensure that your User Permissions have been configured accordingly to prevent unauthorised Staff or Users from accessing the POS Screen Layouts functionality.
Also ensure that Live Button Programming is disabled, as Live Button Programming can be used to configure/modify buttons on the POS Screen whilst using the POS Screen (a Clerk can use Live Button Programming to modify the button and view the password, then access the function by entering the password and/or modify the password).
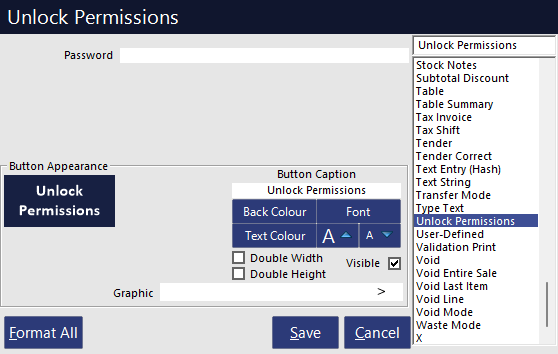
If no password is entered when creating the button, the Password prompt will not appear, enabling unrestricted access to the button (providing that the Clerk has access to the POS Screen Tab where the button is located).
A card can be used that is automatically linked to a manager which will allow them to simply swipe the card, which enters the password and unlocks the permissions on the terminal.
Go to Setup > POS Terminals > Modify selected Terminals > Clerk/Customer Reader tab > Magstripe Reader > Unlock Permissions Code.
When this card is swiped at the terminal the permissions will toggle on/off.
Highlight the Unlock Permissions Code field and press “Test” > Swipe the Card that will be used on the terminal > The Number will display in the Test Field and Unlock Permissions Code field.
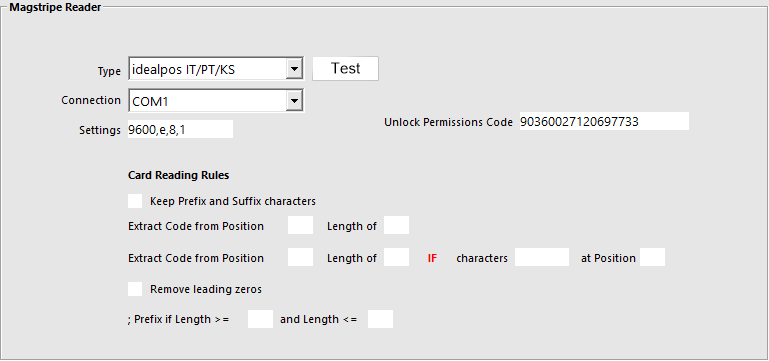
In our example, we have programmed the card to use 90360027120697733^ to unlock permissions.
It is very important to ensure that the code that is entered in this field is NOT used for Customer Accounts, Laybys, Bar Tabs etc.
Cards do not have the option of using a password for accessing the function, as the card is considered the password and therefore, access to the card allows access to the function.